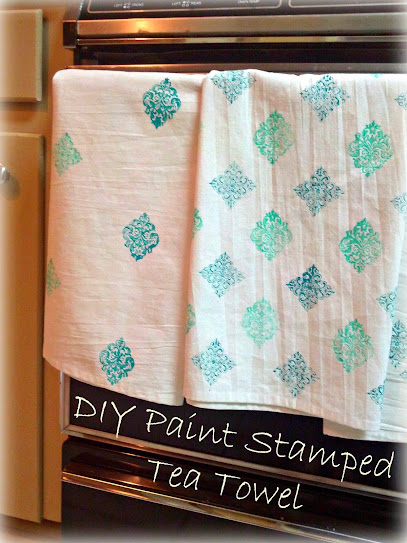
Fabric Paint Stamped Tea Towel
A friend of mine has an adorable house, and it is difficult to give a decorative gift to someone with an adorable house, because everything always looks perfect! If you need a gift for a person like this, don't give up and buy a gift card just yet! These super cute and trendy fabric stamped tea towels are a great idea. They are custom made, so you can fit the colors and designs to any decor, and even a non-crafty person can create a memorable gift for yourself a friend.
What you need:
- Cotton linen tea towels (I used Aunt Martha's)
- Martha Stewart Tintable Fabric Medium
- Acrylic paint
- Rubber stamps
- Ruler
- Pencil
- Foam brush
- Waxed paper
To make these adorable stamped tea towels is an easy project. First gather all your supplies- choose which paint colors you want to use and which designs of stamps. Next think through the design that you want to put on the towels (the possibilities are endless!). I did four different designs for this particular project.

First pre-wash, dry, and iron the towels to have a clean surface to design. Next, lay out the design. I measured where each stamp would go in advance, and marked those spots with a pencil, making a tiny dot.

I also put my towel on top of a plastic tablecloth, just in case any paint bled through!


Take your first color of paint and mix it with the tintable fabric medium. Make sure to shake both well before using. When mixing the two together use a 1 to 1 ratio of paint to fabric medium.
After you mix the paint, I use a foam brush to paint it onto the shiny side of waxed paper. I then put the stamp into the paint on the paper to make sure that the paint is evenly coated on the stamp before stamping it onto the fabric. You could also paint it onto the stamp with a brush, but I like the waxed paper method.

Carefully stamp your design where the dots are marked, making sure to recoat the stamp with paint in between each stamp on the towel. You may want to practice stamping the paint on paper before you go to the fabric, just to get the hang of it!

Use as many colors and designs as you would like! Cleanup between colors is easy- just rinse out your stamp and brush with warm water. Since the paint is acrylic, rinsing it off is a breeze!

Once you are finished, let the towels dry for 24 hours. I know...waiting.
After that, you have to heat set the designs to make them permanent. This is the most boring part. Iron on the wrong side of the fabric using a DRY iron (steam could smear the design) set on medium to high heat. Iron in small sections, making sure that each section is heated evenly for 3-5 minutes. Yes, add up those minutes in your head and you will realize that 4 towels took over an hour. So, put on some music or a movie, get comfy, and iron away.

Once the design is heat set, the towels are finished! The are machine washable and dryable on the delicate cycle. Now these tea towels are ready to take your kitchen cuteness to the next level! The great thing about this project is that you can use this same method on anything fabric- pillow cases, shower curtains, table runners, cloth napkins, curtains, throw pillows, table cloths, lampshades, Christmas tree skirts, etc. So once your kitchen is cute, start custom designing everything else in the house!


How did yours come out???
Comments
Post a Comment